Monday, November 30, 2009

A Few of My Favorite Things

Organizational things, that is!! I think keeping all of our stamping supplies in some sort of organized chaos is half the battle, don't you? I've worked my way up from a few drawers to an entire ROOM of "stuff"! You just never know when you might need that perfect something, right?

This black storage cabinet started out as an oak wardrobe that I found at Goodwill for $80. I'm kicking myself for not buying 2 while I had the chance. My DH removed the wardrobe bar and added two additional shelves to the existing one that was above the wardrobe bar. I painted it black, then he added the nickel hinges and door pulls. I've got baskets on the lower shelf to hold all my alterables. (If you want to see the inside, let me know, you brave souls).


Next up is my Ribbon Ring. I had seen these online. When I read that they were going to be at CHA, I knew exactly where I was going when I got there.

I don't have all my ribbons on there yet but as I use them, they get added...

Next up are my punch rods from IKEA. I absolutely LOVE these. They were only $3.99 for the short ones and $4.99 for the longer ones. I plan on buying a few more on my next trip. They are flat rather than round so they hold punches perfectly.


The next two photos show my most favorite thing...my stacking paper shelves. My paper was all over my room...in those plastic bins, on shelves, in the closet. Now, ALMOST every bit of my 12 x 12 DP is on those shelves...(um, one good thing is you can add more), plus my solid Bazzill, and my Papertrey. Yep, I'm a paper junkie and I haven't found a cure. The shelves are sturdy, you can stack them on the floor or on a desk and add or remove at will. Perfect!

The plastic bins hold ribbon, ink pads, bling and that file cabinet holds all my SU cardstock filed by color rather than by family. Oh, and it goes without saying that I love my OTT lights. Couldn't see without them. I have 4...all sizes. JoAnn's has some great sales and I got one super cheap at Tuesday morning.


If you visited my room pictures previously, you might have noticed I've painted the walls. That was my first experiment with color and I found that, although the color was beautiful, the blue/green threw off the light in my room. Now it's a nice, soothing muslin...a friend once described my color style as beige...and you know what? I'm ok with that!!


Thanks for stopping by...I totally missed the fact that I've passed 25,000 hits...thank you so much. Be on the lookout for some good blog candy to come!


Pin It!

Wednesday, November 25, 2009

Can you help Love 146?

Happy Thanksgiving to you and yours!

We will not be able to be with our families this year so we will be thanking God for His goodness and mercy to us in the company of good friends.

In this season of thanks and giving, I thought I would direct you to an organization you may not have heard of. It's called Love 146. This group works to fight the trafficking of children for sexual exploitation. (click for more information)

My friend's daughter-in-law has created these ornaments for sale on Etsy to help raise funds for this cause. Each one is hand stitched and comes with a tiny book that she created to tell the story of a young girl caught in the web of
child sex trafficking who was rescued and rehabilitated by Love 146.

If you give ornaments as gifts, this would be a way to give, educate and help this worthy cause.

May you be blessed as you hold your children and your families close to you this holiday season.

Happy Thanks and giving,


Pin It!

Tuesday, November 24, 2009

Snoopy Smells a Chocolate Chip Cookie!

You'll see why I chose this image when you see the photos below. :-)

I combined two challenges today...Mercy's Tuesday Sketch #49
and the Clean and Simple Challenge CAS42
on SplitcoastStampers to use sponging on your card.

If you click on the card, you can see that I masked Snoopy and the wording and just sponged the sky around him.

Now for why he smelled Chocolate Chip cookies...


I know these chips aren't new, but I've been timid about substituting them in my Chocolate Chip Cookie recipe (you can find the recipe here).
It's that old "why mess with a good thing?" issue.

I've got to tell you...I could have eaten the entire 6 dozen all by myself!! I ate two, warm from the oven, put some in the mailbox for our mailperson, then whisked them pronto, into the freezer before I gobbled them all.


Supplies:
Stamp - Stampabilities Snoopy
Paper - SU Real Red, Bashful Blue, Old Olive, scraps from last Christmas
Ink - Memento black, Prismacolor alcohol markers
Accessories - Spellbinders long rectangle label die, ribbon, 1/2" circle punch
Pin It!

Monday, November 23, 2009

Clean and Simple Christmas Joy

Since I lost a few weeks of my life to the dreaded flu, my Christmas cards this year need to be Clean and Simple yet I wanted them to be a bit elegant, too. I decided to CASE myself using this card.


Using the assembly line method, I can make dozens of these in no time. A bit of sparkly glitter on the snowflake and the wording plus that lush flocked paper from SU gave some glam without alot of effort. The image panel is popped up on dimensionals. A tiny snowflake is glittered next to the inside sentiment.

So much more sparkly in real life...anyone know how to capture that?

Dimensions: Card base - 8" x 5-1/2" scored at 4"
White strip - 5-1/2" x 1"
DP strip - 5-1/2" x 7/8"
Image Panel - 3-1/2" x 2-1/2"
Inside Panel - 5-3/8" x 3-7/8"


Happy Thanksgiving to one and all. A time to count our blessings and each of you is one of mine. I'll be counting for a long time. :-)


Supplies: SU Real Red, Neenah Classic Solar
SU Christmas Cocoa DP
Stamps: SU Snow Swirled, PTI Snowflake Serenade
Accessories: Glue pen, Snow glitter, corner punch


Pin It!

Friday, November 20, 2009

Get Well Soon and It Could be Yours

Edited to add:
Random Integer Generator
Here are your random numbers:

4
Timestamp: 2009-11-22 03:32:21 UTC


Debbie, I will send you an email for your snail mail address...Thanks for playing along, guys. Stay tuned. I've got more coming...didn't realize I had passed 20,000 and almost 25,000 hits. Gotta celebrate, right?

Sharon Johnson's Stamp Simply Challenge #114 this week is called, "All Wrapped Up" We are to wrap anything for any occasion in any manner.

After my recent bout with the dreaded flu, I know how comforting a steaming hot cup of tea can be. At CHA this summer, they were making a version of this little tea card at the Papertrey booth. I didn't get to make one but my friend, Patty did. I made a template of the basic pattern then designed my own version.

Since cold and flu season is upon us, I can have these ready to pop into the mail and hopefully make someone's day a bit brighter.

You can make these in minutes. For the basic pattern, you will need:

Cardstock - 7" x 3-1/2"
18" of ribbonScor-Pal
Tea bag
clear cello or glassine envelope
Image layers

Line up your cut cardstock at the 1/4" mark on the Scor-Pal. Score at 3-1/2" and 4". Tape your ribbon to the outside so that the ends are even. Layer and decorate as desired. If you use light colored cardstock as your base, you don't need the inside layer. You can pop these into a regular A2 sized envelope so they will take regular postage.


If you've read this far, just leave me a comment and I'll draw a winner tomorrow by random number picker (Saturday, 11/21) and send this card to you. Be sure there's a way for me to contact you for snail mail address.


Pin It!

Thursday, November 19, 2009

Christmas Wishes

I just LOVE Regina over at The Cutting Cafe!

She's made creating a stack of Christmas cards super simple and inexpensive with two great sentiment sets.

For this card, I used the Fancy Holiday Seasonprintable stamp set with Stampin Up's Scenic Season. The greeting that comes with the stamp says "Season's Greetings". I loved the trees but not the greeting so I simply cut off the SU greeting then copied and pasted this "Christmas Wishes" greeting from the Fancy Holiday Season set using Print Shop. I changed the color to red and printed out two on a single 8-1/2" x 11 sheet of cardstock.


Regina has also taken care of the inside greeting with her Christmas Inside Greetings set. 15 greetings in various fonts to suit anyone's style. After I printed the front of my card, I flipped my cardstock over, put it back in the printing tray, then copied and pasted my inside greeting. Easy...two cards at a time!


I simply inked up the trees, wiped off the bird and colored it with red marker, stamped and liberally coated everything with a dusting of sparkly glittery snow. Everything glitters...wish you could see this IRL. Stacks of Christmas cards for pennies. Thanks, Regina!!

Supplies:

Paper - Neenah Classic
Stamps - The Cutting Cafe, Stampin Up
Ink - SU Garden Green , Real Red marker
Accessories - glitter glue, glue pen, Martha Stewart ultra fine crystal glitter


Pin It!

Wednesday, November 18, 2009

A Blog Award and A Cutting Cafe Winner!!

This post will stay on top until Wednesday, the 18th. Please scroll down for new posts and tutorials. If the winner doesn't contact me by Wednesday, I will draw another name, so stay tuned.


While I was sick, I got this sweet blog award from Kelly. My mind must have been in a total fog because I forgot to post it. Thanks so much Kelly!! I will be sure to pass this award on. If you haven't popped on over to Kelly's blog yet, you've really missed out. This lady has super talent!

Here are a few talented ladies I'd like to give this happy award to:


Tammy
Sabrina
Sue
Charlene Merrick
Susan


We have winner of the Planner, Christmas tags, and Notebook Cover templates from The Cutting Cafe!
Random Integer Generator


Here are your random numbers:


24

Timestamp: 2009-11-15 16:43:05 UTC


Karen said:

Your planners and tags are such great ideas and who couldn't use more organization?Hope you are feeling better too!

November 12, 2009 2:52 PM


Congratulations, Karen!! Please email me: cookiebaker57@gmail.com asap with your email information so we can get your file to you. If I don't hear from you by Wednesday, I will draw a new winner.

A big Thank you !!! to everyone who played along...stay tuned, you just never know when another giveaway will pop up.

Pin It!

Tuesday, November 17, 2009

It's Time for A Recipe Break

It's holiday time once again and that means baking at my house. Today was our last session in our Beth Moore Daniel Bible study...it was just truly awesome. A lot to take in but time well spent.

We decided to celebrate with a buffet breakfast. Several ladies brought some truly delicious treats...cheese grits..mmmm, pumpkin bread, fruit salad, little quiche like cups, and I made this yummy Butter Almond Coffeecake.

For those of you who've never tried working with yeast, this recipe is perfect. No kneading! Your mixer does all the work and you get all the credit. It takes just minutes to prep the ingredients then you go do something else for 90 minutes while it rises. Bake for 20 minutes and done! Here's the recipe...remember to use real butter as it's a major flavor ingredient in this recipe.

Butter Almond Coffeecake

Topping
1/3 cup butter, melted
1/2 cup sliced almonds
1/2 cup sugar
2 T. light corn syrup
1/2 teaspoon almond extract

Dough
1-3/4 to 2 cups all purpose flour
1/4 cup sugar
1/2 teaspoon salt
1 pkg. active dry yeast
1/2 cup milk
1/4 cup butter
1 egg

Grease an 8 or 9" square pan. In small bowl, combine all topping ingredients; blend well. Spread evenly in bottom of prepared pan, set aside.

Lightly spoon flour into measuring cup; level off. In large bowl, combine 1 c. flour, 1/4 c. sugar, salt and yeast; blend well. Heat milk and 1/4 c. butter until very warm (120-130 degrees). Add warm liquid and egg to flour mixture. Blend at low speed of mixer until moistened; beat 3 minutes at medium speed. Stir in an additional 3/4 - 1 c. flour to make a stiff batter. Spoon evenly over topping mixture in pan. Cover loosely with plastic wrap and a cloth towel. Let rise in a warm place (80-85 degrees) until light and doubled in size, about 1-1/2 hours.

Heat oven to 375 degrees. Bake 20 to 25 minutes or until golden brown. Don't overbake. Immediately turn onto serving platter or foil. Serve warm. Makes 9 servings.

Enjoy!!


Posted by Picasa
Pin It!

It's FREE, It's FREE!!

Ok, ladies, position your most nimble fingers on that keyboard and head here pronto because this is a limited time offer.
Just until Thursday, November 19th, Regina is giving away a HUGE set called Christmas Daily Planner absolutely FREE !!! After the 19th, the set will retail for $12.99 !!!
This is Regina's Thanksgiving gift to you and I'm honored to have the pleasure of passing it on. This cool set has 84 images!!! You read that right....84!!!
....so why are you still reading this post? ;-)
Pin It!

A Blog Award


Wow...I am so humbled...Sue, a uber talented stamper/blogger, I'd love to have for a friend/neighbor....(the woman bakes too!) has graced me with this sweet award. You've got to see her Penny Black and House Mouse creations. This lady can do things with Copics and paper that you won't believe.

The award came with the stipulation that I had to pass it on to 5 other talented ladies AND answer in one word the following questions....now anyone who knows me well, knows I can't say ANYTHING in one word, but I gave it a go...it's much, much harder than you'd think.

Head on over to see these lovely ladies, you won't be disappointed. My answers follow.

Deena
Regina
Peet
Jessica G
Enfys

1. Where is your cell phone? purse


2. Your hair? ponytail


3. Your mother? distant


4. Your father? dead


5. Your favorite food? pie


6. Your dream last night? none


7. Your favorite drink? milk


8. Your dream/goal? Creating


9. What room are you in? Office


10. Your hobby? stamping


11. Your fear? accidents


2. Where do you want to be in 6 years? Tennessee


13. Where were you last night? Concert


14. Something that you aren’t? Shy


15. Muffins? Apple


16. Wish list item? Bosskut


17. Where did you grow up? Ohio


19. What are you wearing? Shorts


20. Your TV? On


21. Your Pets? Dog


22. Friends? Awesome


23. Your life? Blessed


24. Your mood? Calm


25. Missing Someone? Grandchildren


26. Vehicle? Hyundai


27. Something you’re not wearing? Shoes


28. Your favorite store? Archivers


29. Your favorite color? Green


30. When was the last time you laughed? Today


31. Last time you cried? Movie


32. Your best friend? Patty


33. One place that I go to over and over? Church


34. Facebook? Yes


35. Favorite place to eat? Carraba's


Pin It!

Monday, November 16, 2009

More Quick Gift Ideas and a Tutorial

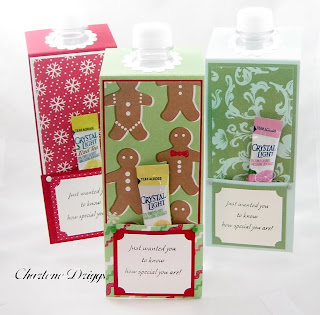
Here's another project many have seen but may be new to some of you. I've re-created the water bottle card for Christmas gifting. A way to refresh someone's body and spirit!

This cover fits a Zephyrhills water bottle, just adjust the length to fit whatever water you use.

Here's how to do it:

Supply List:

water bottle
drink packet
Cardstock
DP
1-1/4" circle punch
scallop circle punch
Scor-Tape
2 brads
Mono Multi glue
double sided tape

Cut solid cardstock 3" x 11"
Score at 2"
Turn and score again at 2-1/2"

For the top:
Fold the 2" scored side back (away from you) and the 2-1/2" scored side up.
Punch the 2" end with the 1-1/4" punch
Punch a Scalloped circle
Dab Mono Multi on the scallops only, leaving the center clean

Hold the cardstock to the light and place the scallop circle over the 1-1/4" hole. Press down and punch out the hole with the 1-1/4" punch again. (this is the easiest way I've found to make sure the scallop is centered)

For the center:
Cut the solid cardstock panel - 2-7/8" x 5-3/8"
Cut the DP - 2-3/4" x 5-1/4"
Adhere to main panel with double sided tape

For the bottom pocket:
Cut the colored solid - 2-1/2" x 2-1/4"
Cut the image panel - 2-1/4" x 2"
Adhere with double sided tape

Attach brads to top corners of the bottom pocket
Add your drink mix and bless someone with a soul and thirst quencher!


Pin It!

Sunday, November 15, 2009

Back with a Cutting Cafe Project and a GIVEAWAY!

This drawing is closed as of 12:00 p.m. Sunday, Nov. 15th. Thanks!...I have a couple of tutorials you will want to make for Christmas so scroll down.

Wow...I've never had a flu bug that knocked me off my feet for this long. Even the bronchitis I had this spring didn't hit me this hard. I'm feeling better but still tired and somewhere between a frog and a whale....croaking voice and blowing nose!! ;-) My Mojo hasn't quite returned to normal yet, but it feels good to want to create again so hope springs eternal.


Regina must have know how much I love planners when she came out with this super HolidayPlanner set..I used the Cutting Cafe Notebook/Planner (woo,hoo it's Free..see here for details) She even designed inner pockets and included lists for notes and gifts in the Holiday Planner set that fit right in this super planner template that are ready to print and pop right in.


I added an extra pocket on mine and decided to use her awesome Christmas Gift Tag set so my tags would be ready to pop onto my gifts as soon as I get them wrapped. I won't have to hunt for my receipts either because there's a pocket for them as well. Everything nice and organized...Love it!!


I didn't have time to finish them all but there are 14 tags ready for you to print, cut and decorate. I used double sided tape on some of mine to just stick on my packages.


Regina has said I can give away ALL THREE OF THESE SETS!!! The Holiday Planner, the Notebook Cover and the Christmas Gift Tags.

Just leave me a comment by Sunday, November 15th.

Supplies:

Digital Stamps : Cutting Cafe Notebook Cover, Christmas Planner, and Christmas Gift Tag sets
Stamps: Papertrey Holiday Button Bits

Paper: Neenah Classic Crest White, Basic Grey Figgy Pudding, Papertrey Ripe Avocado, Pure Poppy

Accessories: Ribbon, bling, Spellbinders Circle, Label, Rectangle dies, Scor-Pal, Scor-Tape, button, Liquid Pearls

Blessings!

Charlene


Pin It!

Saturday, November 14, 2009

More Christmas Gift Ideas

Here's another oldie but goodie quick Christmas/Birthday gift idea...a post it note holder with matching beaded pen. For Christmas gift giving, just leave off the sentiment.


These are gifts that are useful, inexpensive and appreciated by everyone. You can make them masculine or feminine depending on your choice of image.


Supplies:
4 X 6 acrylic frame turned upside down (Walmart about $1)
4 x 6 piece of DP
Post-It notepad
Scor - Tape (for taping the pad down on the frame)
Misc. stamps for image panel
For pen: Micro beads, Super Tacky Tape (you can buy supplies here), DP


Pin It!

Friday, November 13, 2009

Matchbook Candy Holder


Are these not just adorable?!!! I love little gifts that I can give on the spur of the moment. One thing I love to do at Christmas is tuck a little surprise in my mailbox a few times a week for the mailperson. Just a way to say "I appreciate you". She gets a big plate of cookies, too!
You can find the tutorial for these adorable little Matchbox Candy Holders
on SplitCoastStampers. They are so easy you can make dozens in a day.
I'm showing you some I did for Christmas and some for Thank you's and birthdays.


Pin It!

Thursday, November 12, 2009

The Chocolate Book is Back!

Since everyone is in the gifting mode and budgets are slim this year, I thought I'd bring back some oldies that I've had numerous requests for plus some new projects that I'm catching up with since I've been sick. (still froggy but better each day..thanks for the prayers, guys!)

First up is the Chocolate Book. I love this little gift and so does everyone who gets one. You can't go wrong with 2 kinds of chocolate, right? I'm showing it in two versions...one for birthday and one for Christmas. You can find the tutorial and the download for the inside pages here on Splitcoast in POST 12. I designed this for Scor-Pal a couple of years ago. I've posted it in both PDF and Word formats. Please note: While I share this design for your personal use, it is copyrighted and may not be sold or submitted for contest.


Supplies:
Paper - SU, Martha Stewart, Misc.
Stamps - Papertrey Holiday Button Bits
Ink - Versafine Gingerbread, Black, SU markers
Accessories - Scor-Pal, Scor- Tape, buttons, Dark & Milk Chocolate Hershey bars, PDF printout

Pin It!

Wednesday, November 11, 2009

Dasher in Blue

Don't forget to leave a comment here
for The Cutting Cafe giveaway. I'll draw the winner on the 15th!

This quick card is for the Clean and Simple Challenge (CAS40) on Splitcoast. This week was a Color Challenge to use one color plus white.

I chose the Dasher image from Stampin Up. He's stamped in Versafine Sea Breeze and clear heat embossed. The Cuttlebug folder background and the edges of the Baja Breeze label are glittered using a glue pen and Martha Stewart Crystal fine glitter.

Supplies:
Paper: Neenah Classic White, SU Baja Breeze
Ink: Versafine Sea Breeze
Stamps: SU Dasher
Accessories: Cuttlebug embossing folder, Spellbinders label die, glue pen, Martha Stewart bling and glitter, American Crafts ribbon


Pin It!

Trick or Treating

Don't forget to comment here for the Cutting Cafe Giveway!
Thought I'd share a few photos from our trip to see our kids and grandchildren. We got to go trick or treating with them...such fun! The first one is me with our granddaughter, Ann. The neighbor had just hung this ghost on the tree so we had to go check it out!

This next photo is our oldest son, Steve, aka, Daddy, carving the pumpkin according to Ann and David's instructions.


All done!

Dressed and waiting to go...hurry up, Mom and Daddy!


Finally....I think my favorite candy is in there!!


It was alternately warm - 78 degrees and freezing - in the 30's overnight, while we were there. Even though we both came home with flu, we wouldn't have missed a minute of it!
Thanks for visiting...I've got several projects lined up to show you so be sure to pop back in.
Pin It!
01 09 10